Showing posts with label Cloud 9. Show all posts

Monday, June 4, 2012

Cat Mini Album


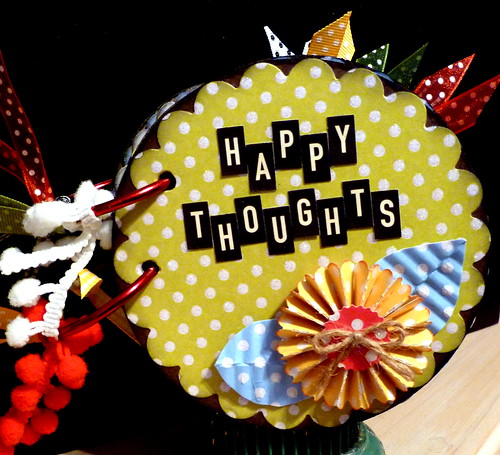
Today I'm sharing a mini album I made for my dog groomer. It's a cute 4-inch by 4-inch cat book. I create pet cards for my groomer that she sells to her clients and now she's going to take a few mini albums. I'm starting on a dog one now that I'll share when I finish it.

For the pages I used 4-inch coasters. They are so perfect for this type of project. I picked them up last summer on eBay. I think there were 100 in the pack. I bound the book using spiral binding wires from We R Memory Keepers.

I hung a charm from the binding with jute. I've had alot of my cat embellishments in my stash for quite awhile, so I'm not sure who the manufacturer is.


Here's a top view. I used six coasters for the pages. There are a total of 10 pages and room for 22 photos using the photo mats that are included throughout the book.


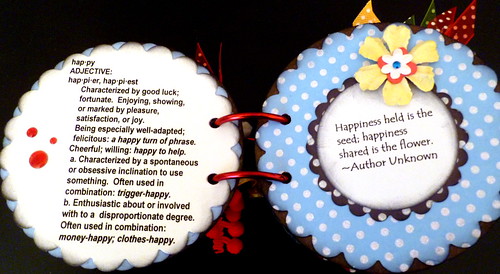
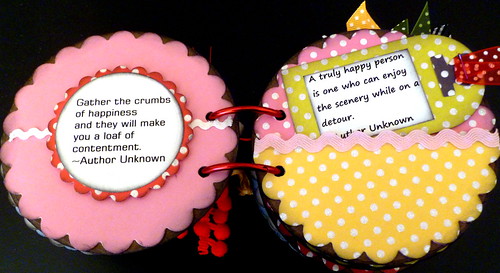
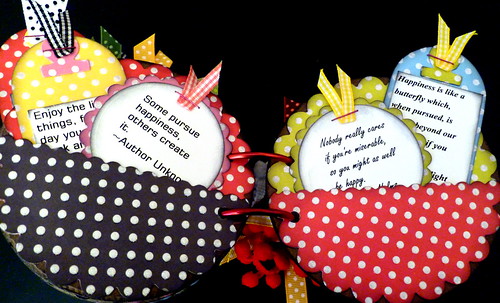
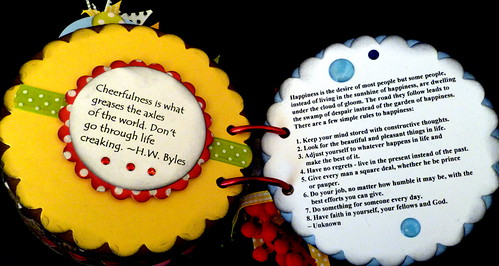
For the patterned paper I used DCWV The Pet Stack. The solid papers are also from DCWV. On this page I added dimension by adhering the photo mat with pop dots. I added a brad that says "purr..." On the second page I added a pocket. I used the open scallop punch from EK Success for the border. The pocket holds one photo mat and a tag with cat quote. I typed up three quotes in Word using different fonts and then adhered them to shipping tags.


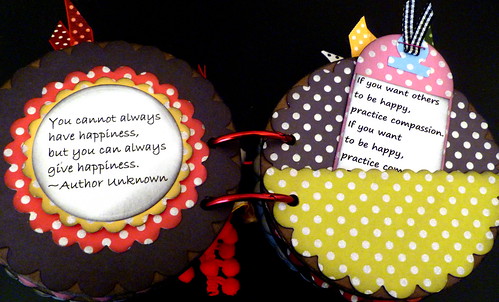
I left this page blank so the recipient can add a photo or whatever strikes their fancy. On the next page I added a vertical pocket and added a cat quote sticker. I'm not sure who the manufacturer is for this sticker as I used stickers from NRN Designs called Cat Quotes and from Cloud 9 Designs called Simple Thoughts. This pocket also holds two photo mats.


The first page here holds three photo mats and the second one has one mat and one tag. I used another cat quote on the band.


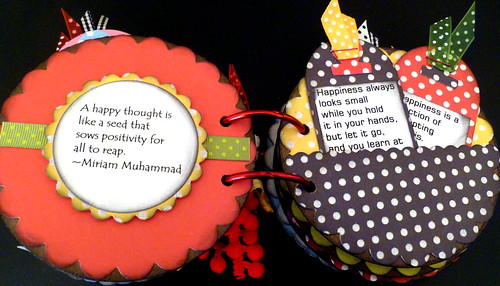
To add dimension to this page I added a metal embellishment to the top of the photo mat. I popped it up with pop dots. I left the next page blank since the paper was so cute. A photo can also be added to it.


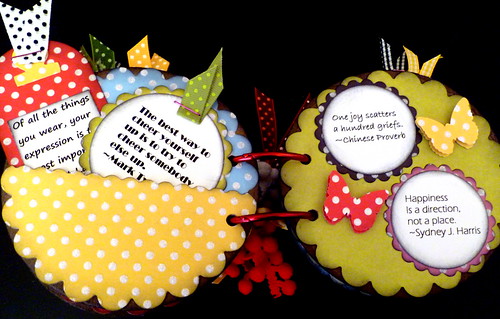
On the first page shown here I made a flip book that has five pages. I watched a tutorial on how to make this from my friend Susie over a Creative Cafe. She creates beautiful books! Be sure to check them out if you get a chance. I did make a video of this book that you can see here.

This post is linked to these parties: All Things Fee, Craft-O-Maniac Monday, A Round Tuit, A Marvelous Mess, Inspire Me Monday, Handmade Tuesdays, Made by you Monday

Thanks for stopping by!

Thursday, August 25, 2011

One Stamp, Three Cards

One Stamp, Three Cards
I took a technique card class last week and I really enjoyed it! I generally don't gravitate toward alot of new techniques when it comes to stamping. I know this sounds terrible, but I like the way I create my cards. I would prefer just to admire other cardmaker's work. I do emboss but it makes me uncomfortable. It doesn't always turn out how I would like it to. Taking this class took me out of my comfort zone just a little.
Happy Birthday
I used scraps from my stash for all three cards. What a fantastic way to recycle them. Of course if you could see my stash, I'd be here for years creating hundreds of cards!

For this card, I stamped the image on a piece of cardstock that had small squares. I don't have the name of the manufacturer for this paper. I used my new found love.....Inkssentials Enamel Accents from Ranger. I adore this stuff! I bought the two pack of black and white. It's so much more economical to use this rather than gemstones. Especially for mailing. I'll never quit using gems, but I like having the option of another product.
Smile
Secretly this one is my favorite, but I really like all of them. This technique was doubly hard for me because it was embossing and coloring! I'm not good at the coloring part which is why I never use markers. I was so apprehensive learning this one. Since Tim Holtz Distress Inks are used in combination with a waterbrush it was fun and easy. I'm not one to have alot of ink colors so creating this one at home was a bit of a stretch. I'm going to keep practicing with different stamps until I get better at it. For the flowers, I used Tim Holtz Trimmings and cut three of them apart. I inked them with Tim Holtz Distress Inks and add a Hero Arts Pearl Gemstone in the middle.
Thank You
This one really has a piece of my heart, because I used black embossing powder. Black is one of my favorite colors and paired with this paper from Making Memories called Love Struck, it really stands out. I used black Fiskars Raindots around the bottom.

I'll be adding these cards to my Etsy shop in the next few days. If you're interested in them, check back to see when they're listed.

This post is linked to these parties:
All Things Fee
Creating Success Around the World
Inspire Me Monday
Inspiring Creativity
Delightfully Inspiring Thursday Party - 26
Turning The Table Thursday

Thanks for stopping by!

Monday, July 4, 2011

Wedding Cards

Congratulations On Your Wedding
Today I'm going to share four wedding cards I created for a friend. For this card I used my new Shapeabilities Fancy Tags Die. I picked this die up while on vacation and I think I'm going to use it alot. Out of all four cards, I can't decide if this one is my favorite or this next one.
Love
I can't make up my mind! I like the patterned paper I used for this card. It's from TPC Studio called Wedding Silhouette Tapestry Stripe. I paired a Creative Imaginations brad I had in my stash with a Hero Arts flower. Behind the flower I added some tulle that I inked and then inserted a Maya Road Trinket Pin in Vintage Black Pearls. I love those pins! I'd been searching for them for awhile and found them at Archiver's. Here's a closer look at the flower.
Love closeup
For this card, I had to get some black in. It just wouldn't be like me to create some cards and not use black. My friend gave me free rein to do whatever I wanted. I even made mention to her that I like to use black and she said she was fine with whatever I came up with.
May Your Love....
For the leaves I used a Sizzix die I have called Branch with Leaves. The sentiment is called "Love Continues To Grow" from Versus Rubber Stamps.
May Your Love...inside
For the inside of this card I used a Hero Arts stamp and an EK Success Edge Punch called "Brackets".
Congratulations/Best Wishes
For the fourth card I didn't use a stamped sentiment. I thought the patterned paper I used from Best Creation Inc worked well since it had sentiments on it. I did use a Hero Arts stamp called Dot Flourishes. I stamped it on the cardstock using Versamark and added some Stampendous Dot Sparklers.

That's it for the wedding cards. In my next post I'll share the sympathy cards I made.

Here's a list of products I used for these cards: PTI Cardstock, Tim Holtz Vintage Photo & Black Soot Distress Ink, Shapeabilities Fancy Tags Die, Hero Arts Flowers, Studio G iClear Wedding Stamp, Versus Rubber Stamp - Love Continues To Grow MA0320-E, EK Success Edge Punches: Open Scallop & Brackets, TPC Patterned Paper - Wedding Silhouette - Tapestry Stripe, Brad from Creative Imaginations, Clear Embossing Powder, Tulle, Hero Arts Stamps - Live Life - CL498, Versus Rubber Stamps - Warm Congratulations - MA0328-F, Ranger Liquid Pearls in Silver Pearl, Maya Road Trinket Pins in Vintage Black Pearls, Versamark, Patterned Paper from Doodlebug Design Inc called Beetle Black Serenade, Sizzix Branch with Leaves Die, Cloud9 Design Rain Dots, Hero Arts Stamps - Everyday Sayings - CL342, Ribbon, Hero Arts Stamps - Flourishes - CL235, Stampendous Dot Sparklers.

Hope your have a fun and safe 4th of July!

Saturday, April 30, 2011

Happy Thoughts Mini Book

I created this mini book from some cardboard circles that were going to be tossed in the trash. Much to my husband's dismay, I've become a hoarder of anything that I think has a possibility of being altered into a creative project.
Happy Thoughts Mini
I used my new Tim Holtz Mini Paper Rosettes die to create the flower.

I love quotes, so I gathered up some "Happy Thoughts" and decided they would be perfect in a mini book to reference on days when you just aren't feeling very chipper. With all this nasty weather we've been having and not seeing much sunshine, I don't know about you, but it really gets to me.
HT pg 1 & 2
HT pg 3 & 4
HT pg 5 & 6
HT pg 7 & 8
HT pg 9 & 10
HT pg 11 & 12
HT pg 13 & 14
I used a Sizzix die and Nestabilities to cut my tags. Not liking the hole in the tag, I used my new Tim Holtz Tiny Tabs & Tags Sizzix Bigz die to cut a tab that I secured on the top. I then stapled ribbon to it.

I really wanted to make this a simple little book. I love the bright, dots on this paper as I think it looks "happy". I used six sheets of 12x12 paper, eight cardboard circles, two rings, tags I diecut, miscellaneous ribbon and embellishments from my stash.

My husband thought the book need photos. I had to remind him that you can make books without pictures!

Products used for this book: Classic Scalloped Circles Small & Standard Circles Small Nestabilities, Basic Glitter Patterned Paper by Best Creation Inc, Tim Holtz Distress Ink in Black Soot, Tiny Tabs & Tags Sizzix Bigz Die & Mini Paper Rosettes Die, Mini Market Stickers from October Afternoon, Miscellaneous Ribbon, Cloud 9 Design Rain Dots, Miscellaneous Flowers, Hero Arts Metallic Decor, and Martha Stewart Butterfly Punch.

Thanks for stopping by!

Saturday, February 13, 2010

Embellish Magazine.com Color Challenge

I know, I know...it's almost been a week since I've blogged. I took a hiatus from from being creative. Quite frankly, I was feeling a little burnt out. I know I do this for fun, but I really feel that when I have to try too hard to think of what to do, then I need a rest.

Yesterday I experimented with flower making and it worked out perfectly for this card. I came across this birthdays color challenge for Embellish Magazine.com, so I thought I'd give it a try. I've used pink and brown together, but never thought about adding blue and green to the combination. I actually kind of like it.

Celebrate with Style


Here's a close up of my flower. I have a bag of tissue paper of all colors and patterns that I've saved, knowing that someday it'll come in handy.

Flower Close Up


EmbellishBirthdaysCC1


Supplies Used For This Card:

Cardstock: Paper By The Piece in Blue, Cloud 9 Design - Be Mine Plaid - Be Loved, Core'dinations, Bazzill

Ink: Memento in Cocoa, Stampin' Up! in Pink Passion

Ribbon: May Arts, Pink/Brown Check Unknown

Sizzix Dots Embossing Folder, Cuttlebug D'Vine Swirls Embossing Folder, Nestabilities Labels One

Brad, Tissue Paper

Hero Arts Clear Design Stamps "Birthday Messages" CL139

Sunday, January 31, 2010

Clean & Simple Sketch FTL76

There were quite a few sketch challenges I wanted to participate in this past week, but I ran out of time. I guess there's always next week. Happily, I was able to get this one done. When I saw this sketch over at Clean & Simple, I really liked it. I created two cards "just because". I do this for no other reason except enjoyment.

Hello


I love the combination of red, white & blue.

Supplies used for this card: Bazzill in White, Making Memories Slice Noteworthy Design Card, HeidiGrace Glittered Flowers, May Arts Burlap in Red, Buttons, Hero Arts Stamps "Feather Grass" CL282, Hero Arts Small Accent Pearls, Memento Ink in Danube Blue, Blue Sheer Ribbon, Clean & Simple FTL76.

XOXO


I seem to be using alot of pink lately, which is unusual. I am finding that I do like pink when paired with green and brown.

Supplies Used For This Card: Bazzill in Parakeet, Cloud 9 Design - Be Mine Plaid, Making Memories Slice Noteworthy & Basics 3 Design Card, Memento Ink in Rich Cocoa, Pink/Brown Checked Ribbon, Hero Arts Stamps "Trees Birds & Messages" CL182, Clean & Simple FTL76.

Clean & Simple FTL76

Clean & Simple Sketch FTL76

Saturday, August 8, 2009

New Layout and A Trip To Boulder Junction

Bond Falls


Yay! Another layout finished. I started this late Friday afternoon and finished it this morning. I'm a pretty slow scrapper so I was pretty pleased with myself that I was able to finish this one quickly.

We took these photos at Bond Falls in the UP in July 2008. Steve, his sister Judy and I drove there from Rhinelander on one of the weekends that I was visiting from Minnesota. It sure is a beautiful area.

For this layout I used Bazzill cardstock, Cloud 9 Design Simple Stripes in Cinnamon Stick cardstock, Sizzix Sizzlets Strips Die & Letters, Hero Arts Flowers Vintage Collection and Meadow and Gemstones in citron, orange and smooth clear and miscellaneous buttons.

We drove to Boulder Junction today. This was my first trip there and it's a cute little town. We checked out the area and stopped in a few of the shops. I loved the Cranberry Gift Shop and will probably go back there. They had some fantastic cookbooks and a few of them I've had my eye on ever since I've been in the Northwoods. Today was the day that I picked one up. I can't wait to page through it and read some more of the recipes! The Orange Cranberry Muffins sound especially delicious.

100_1271A

While in Boulder Junction we took a path

100_1272B

that runs through the woods and parallels the highway. Toby sure was having a good time!

100_1273C

Steve and Toby posed for a picture.

It was a beautiful trail and I wish we had our bikes here so we could ride through the woods. Even though it's gorgeous in the forest, occasionally I really miss my big city concrete!

09 10