

About a week ago I picked up two fifty cent notebooks with the intention of altering the covers. This past Sunday I saw a blog post from Simon Says Stamp that showed an altered notebook and that's all it took for me to be inspired to try one! I went through my stash and picked things out to use. I was so inspired that I made two!
I flippin' love how both turned out! I haven't done anything to the back covers or the inside front and back covers. I'm not sure yet if I plan to or not. If I do I'll just cover them with patterned paper from one of my Tim Holtz papers. If I was giving them away I would, but if I'm going to use them I don't really need to. When the paper's gone I just have more art for my craft room!

I've posted photos below of my progress along the way creating both of these notebooks.
It takes awhile with all the drying time.

I added gesso to both covers.

I went through my stash and added patterned paper, dictionary paper and ephemera using distress collage medium.

After the collage medium dried, I added some white paint.

After the paint dried, I used stencils to add distress grit-paste.

When all was dry, I added several different acrylic paint colors.
I spritzed a lot of water to move the paint around and dried in between the colors.

After all the paint dried I added some distress crayon with my finger in vintage photo with my finger.

For the second notebook, I added gesso first and then die cut some leaves using a die from Simon Says Stamp and added acrylic paint. After the paint dried, I added the leaves using collage medium.

Once the paint dried, I added more paint drying in between layers.
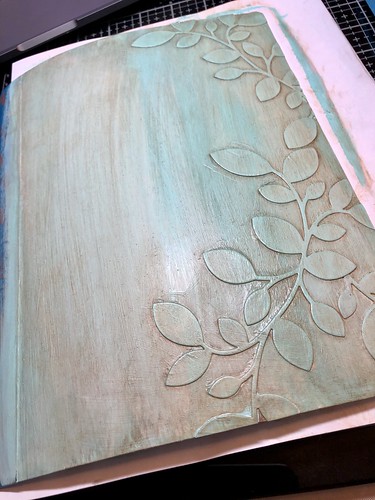
When all paint layers were dry, I smudged some distress crayon in places with my finger.
Below are the products I used. I missed adding a few products in the photos, but I've listed all the names below.


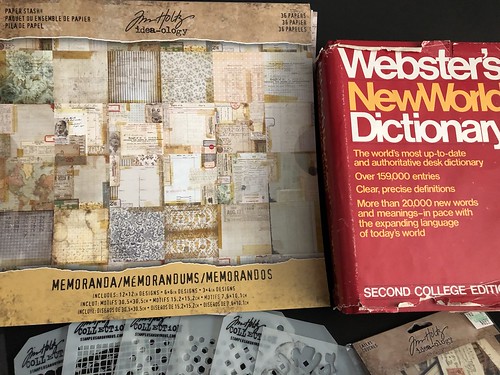
I thought I had lost the dictionary pictured above! I would have been so sad if I hadn't been able to find it! I use dictionary paper for a lot of projects.
I cleaned my craft room a few months ago and put things where I thought they should go. Three times now I have been looking for a particular item and haven't been able to find them. When I clean I purge a lot and I'm always thinking I've gotten rid of something that I want to use. Thankfully, I have had to rip my room apart on several occasions but I have found the items that I've been looking for!
Thanks for stopping by!
Products used:
These were the products not pictured:
Simon Says Stamp: Clustered Leaves die
Tim Holtz Distress Paint - Vintage Photo
Tim Holtz Distress Oxide Ink - Vintage Photo
Products that were pictured:
Tim Holtz Distress products:
Crayons - Vintage Photo
Grit-Paste
Collage Medium
Paint - Picket Fence
Paint - Vintage Photo
Tim Holtz Idea-ology products:
Quote Chips
Hardware Heads
Fragments
Ephemera Pack - Snippets
Layers - Collector
Layer - Remnants
Paper Stash
Design Tape: Butterfly
Design Tape: Postal
Tim Holtz/Stampers Anonymous Layering Stencils:
Gradient Hex
Grid Dot
Linen
Gradient Square
Gradient Dot
ARTplorations Stencil: Happy Flowers
Master's Touch Acrylic Paint:
Scarlet
Virdian
Permanent Black
Violet
Yellow Med
Titanium White
Phthalocyanine Blue
Ranger Glossy Accents
No comments:
Post a Comment